
Monday, November 30, 2020
Thursday, November 26, 2020

Wednesday, November 25, 2020
Give Thanks day 6
Today I am grateful for friends and neighbors who watch out for others. Thanksgiving is tomorrow and a friend didn’t know what my plans were but decided to bring me a pie to help celebrate. I am grateful to those who hearken to the promptings of the Holy Spirit. #GiveThanks
Today I am grateful for friends and neighbors who watch out for others. Thanksgiving is tomorrow and a friend didn’t know what my plans were but decided to bring me a pie to help celebrate. I am grateful to those who hearken to the promptings of the Holy Spirit. #GiveThanks


Tuesday, November 24, 2020
Give Thanks day 5
Today I am grateful for being able to see. My Mom taught me when I was very young, she encouraged my poor attempts until I got better. Sewing is one of my escapes; it allows me to be relaxed & creative.#GiveThanks

Monday, November 23, 2020

Sunday, November 22, 2020
Give Thanks day 3
Today I am grateful for Ward, Stake & Church leaders who still do their callings. Who care enough to guide people. Prepare lessons and messages to help the Saints stay strong & true. #GiveThanks

Saturday, November 21, 2020
Give Thanks day 2
Today I am grateful forFamily. All my family in both sides of the veil. The guidance and comfort they bring. Knowing we can have long gaps of not speaking but still come together and be a family.
Grateful God believes the eternity of families and has given us that piece of heaven on earth.#GiveThanks

Friday, November 20, 2020
GiveThanks Day 1

In this simple picture there is so much to be grateful for. The morning sun rising to bring warmth to the day. A flock of birds that remind us God knows us & watches over us. Phone lines that help us stay connected when the distance is too much to get together. Power lines that provide heat & electricity for warmth & lights. Local businesses who have managed to stay alive and continue to provide services to community even with restrictions. Trees resting for winter that still provide a place of rest for the birds, shade and a reminder to us all to stand true & strong.

Wednesday, November 18, 2020

Tuesday, November 17, 2020
For the Guys - Geometric
I was watching a scrapbook video where the individual was going through paper pads. A paper that caught my attention was one tat was columns of diamonds with lines about a quarter an inch apart which added texture and interest. I originally thought I would re-create columns of diamonds to use on a layout of my brother's graduation from law school. I was g through fabric scraps and came across blue & gold that matched the colors on the commemoration booklet. On copier paper I created my diamond so I could use it to cut out diamonds out of my fabric scraps.

THis was going to be a 2 page layout. Not a lot of pictures but lots of information. For the Left page I created a pocket of two rows of diamonds to hold the large booklet. The pocket base is blue foil which enhances the gold shimmer & brings the blue forward.


Scrap Academy Mood Board Challenge
For Scrap Academy this last week they had a Mood Board Challenge. I like Mood Boards, they have so many interesting helps. For this particular challenge you had to pick 5 minor details after studying the mood board.

This mood board has lots of small details. One of the first things I noticed was the black/white floral pattern on tea cup - it reminded me of a piece of paper I had in my scrap booking supplies. In the picture with brooms I picked up the yellows & greens of the oak leaves in fall. With a close up inspection the upper middle picture I discovered that the little girls coat was a dark brick red - I din''t have something dark enough but close to. The twigs behind the pumpkins intrigued me and began bringing the layout together. I decide to use the Acorns & browns as my final mood board item.

I had beautiful fall photos from a shoot taken of my niece. Her top would be beautiful with the color scheme I had chosen. I decided the black/white floral would be used as a border strip down either end to bring in the tea cup pattern. I decided to try embossing paste & dyeing. I used 3 different shades of brown & a black alcohol marker. I stamped the color on my black & mixed with embossing paste. I couldn't get th ecolor dark enough but decided it would make an excellent twiggy border along the bottom of my layout. I used my pine needle layout & spread the embossing past through it to get a twiggy base. To add some more twigs I used mu dark brown & black alcohol markers to trace branches using another stencil on top of the dried embossing paste.


I used my oak leaf stencil to trace oak leaves on to scraps of yellow green paper. Using scraps of light & dark brown I created mini acorns to add to the bases of my oak leaf to add interest & texture. BElow is my finished layout using this mood board.

Easy Ink Blending
For this class I decided to do Faux Watercolor Swatch Tags. I pulled out my medium tag maker stencil. & scrap white card stock in several weights. By making Swatch tags they could be used on my layouts as well as help become re familiar with all my ink colors.

For most of the tags I used two colors. U used make-up pads as my blending tool. I would wrap the make up pad around the tip of my finger, dab into ink pad then barely touch it to water. Then I used a circular motion to add the color the tag. For my re-inkers.I placed one drop on the make-up pad, barely touched water then applied with circular motion.
Some of my lighter weight papers didn't work as well with the water so it was great experience. I realized that as I did the tags by color family that some of my inks had ended up in the wrong color family so I could rearrange color families properly. I was actually shocked by how many different shades in a color family I have with some color families.
Color Families:
1. Pink - Red
2. Orange & Brown (alot of my browns ended up having orange tones)
3. Yellow
4. Greens
5. Blues
6. Purples
7. Metallics, Black & Gray

Monday, November 16, 2020
Clean & Simple Boutique Cards

I decided how I wanted the 2 photos to lay on the page. . I decided I needed to stamp a partial background. I found a Rose stamp that was perfect for Heat Embossing. I stamped the image in Clear ink then Heat Embossed with Altenew Peach Parfait. In the final layout there was two section of Heat Embossed Roses. After Heat Embossing the pencil lines used for stamping guidelines were erased.


I loved the interior of the envelop and thought they looked beautiful with my rose picture. I used the flap from the envelope for the corner under the Rose. Across the top I cut an 1 in strip to help ground the corner pice. To help bring in the Hot pink Foil I added a 1/2 in strip down the center of the Rose border. While digging through Color blended Tags I found a perfect tag that complimented the Roses, Fussy cut out the Roses on top of the Stationary; added to the bottom of the page which brought the Rose pattern paper across the the layout. For a title I used Hot Pink Glitter letters. To bring the Hot pink across the page I used tiny Hot Pink glitter flowers from the Alphabet sheet.


All About Layering Experiment

The Experiment: Use Altenew Tulip Layering Stamp & PAint a Flower Daffodil Stamps to create the leaf base of an Iris. I know Altenew has an Iris Layering stamp but Irises aren't my favorite flower & I don't use them in a project enough to justify buying the stamp.
This year has being crazy & I spent alot of time studying the Flowers in my Aunt & Uncle's yard. They have a row of purple Bearded Iris that are in the same bed as the Tulips. This year the Irises came up first,lasted a week and were gone..

For the Iris Stem I used the tall stem from the Tulip Layering stamp. I stamped using Versatile Clear embossing Ink Pad. The stem was heat embossed in Clover Meadow. This gave finished the base for my Iris flowers. At this time I wasn't sure I even liked the design it just looked like a mess at the bottom of my paper.


I wasn't sure I liked this layout until I added the pictures. I am quite happy with how this layout turned out.


Friday, November 13, 2020

Thursday, November 12, 2020
All About Layering 2
When I looked at Altenew's Tulip layering Stamp I felt the open Tulip could be used for a rose. I had some beautiful Autumn Rose pictures from this last October. I am not normally a Rose person but when they are stubborn & bloom out of season they make me smile. With these pictures in mind I set out to pick colors & experiment.

I chose three different sets of three colors in the red, orange & yellow color families. Trying to bring out the flowers in the pictures. The colors are in base to outline order, the first Tulip is Mango Smoothy, Taffy, Sorbet, the second Tulip is Coral Bleu, Orange Red, Tulip & the third flower is Peach Parfait, Baby Pink, Blush.
Using my Altenew Re-Inkers, Mango Smoothy, Coral Bleu, & Peach Parfait I used a makeup pad to apply color to stamp. If you want a lighter color slightly wet the spot on the pad where ink be. After experimenting I felt I was ready to begin. At this time my focus changed slightly. Now I would be using the Altenew Tulip Layering Stamp as Tulips. I discovered the following picture from April 2020 and decided to do a story of a Tulip Border.
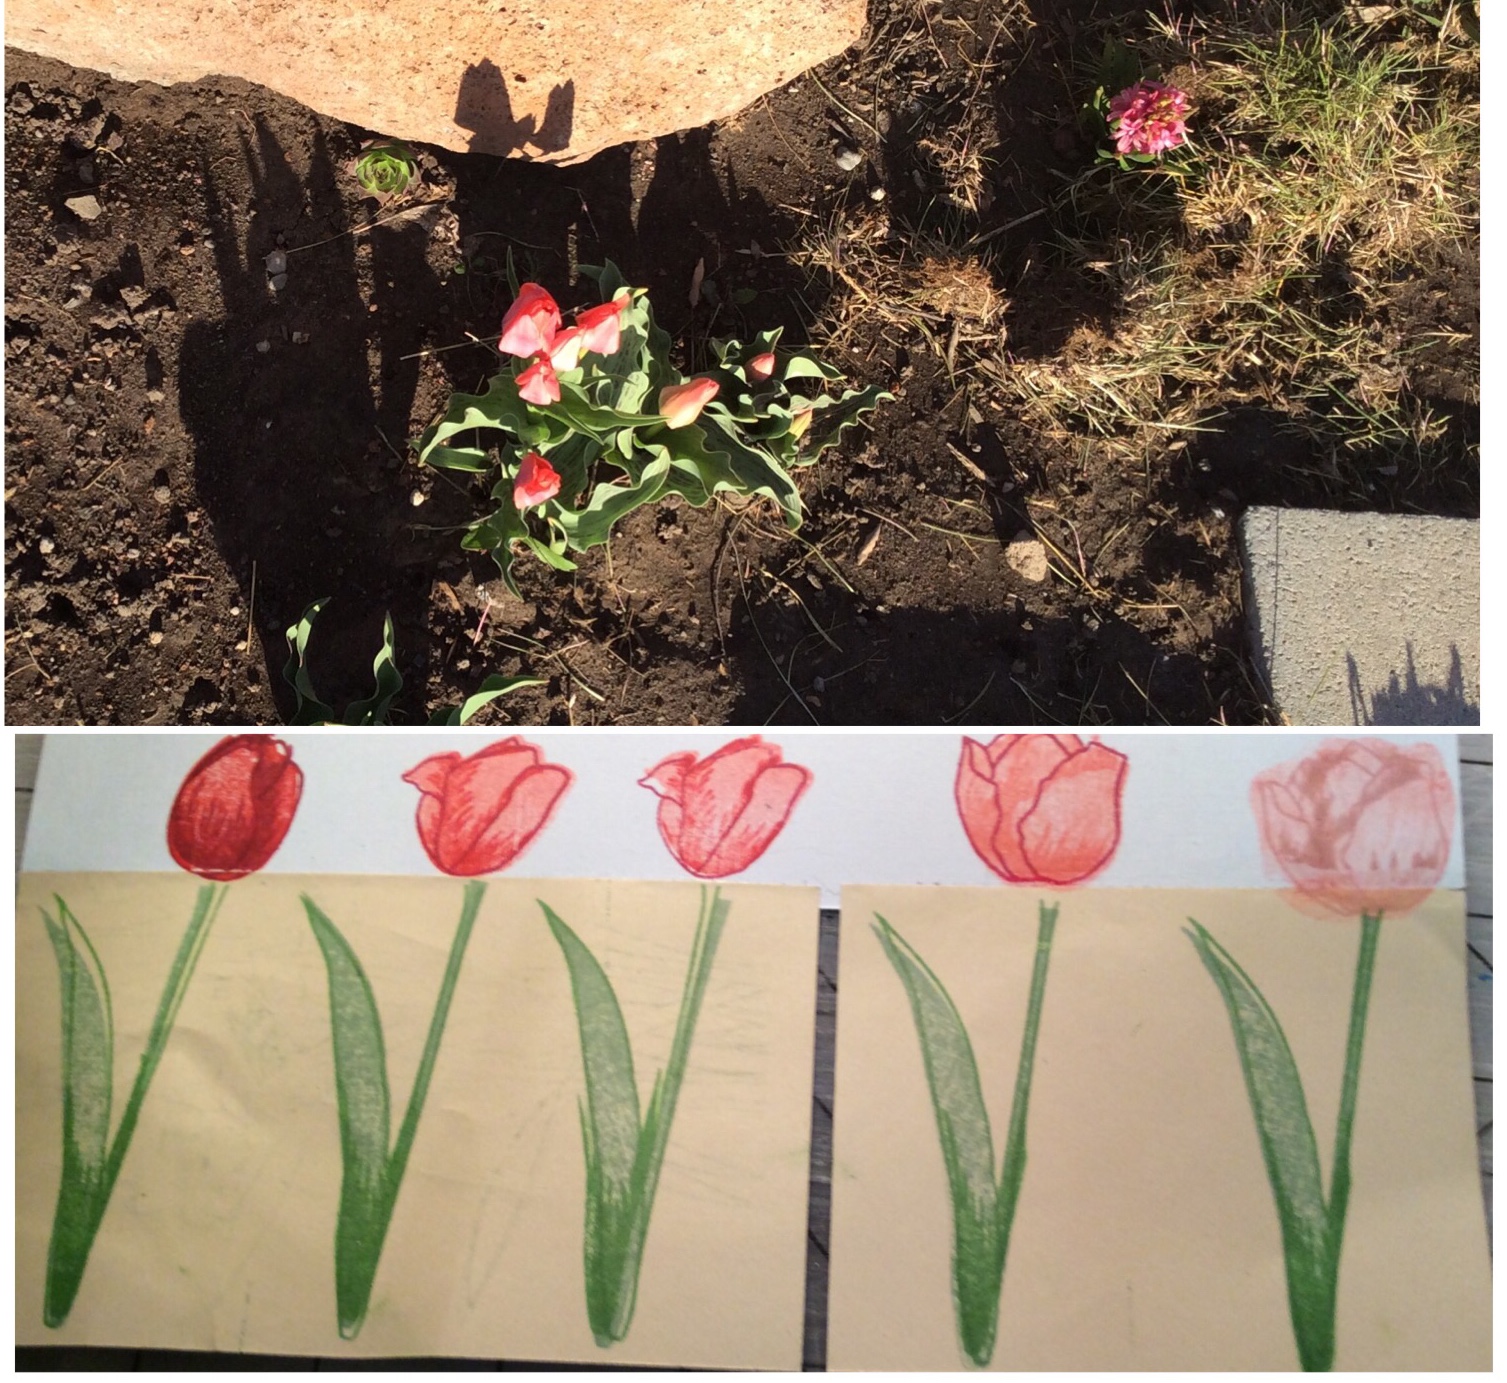
1. Holiday Red, Tulip, Cranberry
2. Orange Red (satmped twice), Holiday Red, Tulip
3. Orange Red (stamped once), Holiday Red, Tulip
4. Coral Bleu (painted & stamped twice), Orange Red, Tulip
5. Coral Bleu (watered down & stamped once). Baby Pink, Blush
The leaves are also tri layered. They were done in Seafoam, Clover Meadow, Clover Meadow. The following image shows the difference between level 2 & level 5 and how using tri layered stamps add interest & depth.

For te Makeup Pad Technique I have mentioned several times here is a clearer explanation. Re-Inkers are designed to bring new life to an ink pad. I find them useful for mixed media scrap booking as well. When you have nk in a bottle and no pad you get creative. Makeup Pads are cheap. Ink Pads can be a pain to store & come in so many different shapes & sizes.. I will put a drop or two, depending on how dark I want my color, onto the pad. If I want it extremely light at this point I just dab my wet stamp cleaner pad lightly. After I get the color I want I paint the stamp in either a swirl motion or up & down motion until I get the color on the stamp intensity I want. I then stamp my image.

This beautiful Tulip border is now ready to be added to a scrapbook layout or card front. It can be cut apart or used as is.

Wednesday, November 11, 2020

Tuesday, November 10, 2020
All About Layering 1
For All About Layering 1 I, used the Lily Layering stamp from Altenew. I used Close to my Heart ink pads & Altenew Alcohol markers. My inspiration was my 2020 Lily Bed pictures. For accents I added green & yellow to help balance the layout and bring in my favorite lily colors from my Father's lily bed..

Green Lily - I used layer 2, from the main tulip image, stamped in Sweet Leaf. Center of flower was stamped in Clover Green..To finish the Lily I used a Crayola Colored Pencil Light Green to color of the image.
White Lilies - The first one did not turn out. I used Grey Flannel for the base color. With the third layer I stamped in white, oping it would pop, it didn't.. Using the second and Versatile Clear Stamp I prepped for heat embossing. The second layer was heat embossed with Kaleidoscope. It turned out to dark. I outlined it with Altenew Alcohol Marker G775 and Red highlights with R378.
The Second white lily turned to be probably my favorite. I stamped the base in White Daisy, the second layer was in Grey Flannel & third layer in White Daisy. I did a second third layer in Versatile Clear & heat embossed with Kaliedoscope. I outlined the flower with Altenew Alcohol Marker W603. The Stamen was stamped with blush.
Yellow Lily - Using Altenew Re-Inker Mango & a make-up pad I I colored the base image. Layer 2 was stamped with Taffy. The Stamen stamp I cored with Altenew Alcohol Marker Y608
Orange Lily - Base layer was stamped in Taffy. The second layer was stamped in Sorbet. Stamen were colored Altenew Alcohol Marker G775.
Pink Lily - Base was stamped in Blush, layer 2 in Amethyst & layer 3 in Iris. The stamen were stamped in Honey.
Leaves - Leaf base for 6 leaves is Sweet Green. The second layer was done Versatile Clear ink & Heat Embossed with Clover Green

Below is the completed layout. All 6 lilies were used and the ones I hated have grown on me. All in all it is a simple layout but the lilies help to enhance the pictures. Thanls for following on this first class journey.

All About Layering 1& 2
The first 2 classes are All About Layering Stamps. There are different stamps introduced in these 20 lessons.. Most of the Altenew layering stamps are florals. I’m not big on florals. I do have two - Tulips & Lily. Of all the layering stamps I looked at these were my favorites and came up with many ideas.
 7
7I look to my other stamps to see what else I have that are layering stamps. In my Close to My Heart Collection I found 9.

Now I was over halfway and had many options for creating. As I was sitting staring at all the stamp sets laying on my table I saw a possible layering opportunity using two different sets to stamp stem & leaf base with a colored fussy cut flower top.

As I was looking at the Program requirements I realized I had jumped the gun. I don't need to do a project for each lesson but a minimum of one per a class show casing what I have learned. Depending on inspiration for each class there could be multiple layouts per a class. Please come join me on this journey
Monday, November 9, 2020


Subscribe to:
Posts (Atom)
Scraps to Quilt Kit #1
This quilt began with 200 extra large triangles. Enough yardage to make a quilt but not whole. As I looked at those triangles the idea of a...

-
 This quilt began with 200 extra large triangles. Enough yardage to make a quilt but not whole. As I looked at those triangles the idea of a...
 -
 In a later post will show what I have been doing with ephemera. I have completed the page kits I had organized and thought I would share ...
 -
For February 2022 I have been asked to be a guest designer and participant in the Counterfeit Kit Challenge. This month's kit is Denim a...
